User Manual
9/11/2000
Table of Contents
|
|
| System Requirements |
| Introduction |
| Installing and Starting |
| Setting up a Game |
| GUI and Keyboard Commands |
| Game Rules (how to play) |
| Chat |
| Weapons |
| Items |
| Strategies and Tips |
| Credits |
Any Java 1.1 enabled browser including
Netscape 4.04 or higher
JDK1.1 appletviewer or higher
Internet Explorer 4.x or higher
Recommended : Netscape 4.7 or IE 5.01 on Windows 9x or NT.
Scorched Earth 2000 is an artillery driven combat game based on "the mother of all games", Scorched Earth, developed by Wendell Hicken in 1990.
Scorched Earth 2000 offers something no previous version of Scorch has offered before: network multiplayer gaming. Using any standard web browser meeting the system requirements you can play against any other player anywhere in the world!
All experienced Scorch users will feel right at home with this new version.
New users need not worry as the GUI is very intuitive and the learning
curve is very easy. So lets get started with installation instructions.
To start playing launch your browser and type in the URL for a Scorched Earth 2000 server. Currently the main server maintained by the developers of the Scorched Earth 2000 is located at:
There is no explicit installation necessary as Scorched Earth 2000 runs
as a Java applet. Logging into a game server will automatically launch
the game and take you to the login screen.
table of contents
SETTING UP A GAME
The objective of this section is to familiarize you with the menus you
will use to start and join games in Scorched Earth 2000.
Login Screen
On connecting to the game server you will be required to login to be able to participate in the game. The Login Dialog pictured to the right will facilitate this process. Type in your User Name and Password in the appropriate boxes. Then click on one of the following buttons:
Login : Click here if you have previously created a user profile.
New Player : If you have not yet declared a user profile, you may do so by clicking on this button.
Guest : Click here if you want to login as a guest i.e. without making an entry into the user profile list.
Leave : Click here to exit the game
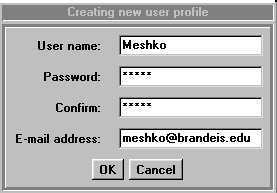
Creating New User Profile
Clicking New Player in the Login Screen will lead to the dialog on the right. You will be required to fill out the following information:
User name : Enter a desired Username
Password : Enter a password
Confirm : Retype the password to ensure it is correct
E-mail address : Enter your email address. Forgotten passwords can be mailed to you using your email address.
Clicking OK will create your profile and allow you to login using your specified username and password at any time in the future.
Clicking Cancel will take you to the previous screen.
Master Client
The first user to enter the game is designated the "master client", referred to hereon as "the MC". The MC is responsible for selecting certain game options upon logging in. This process takes place with the help of the foll owing 2 dialog boxes:
Create new game
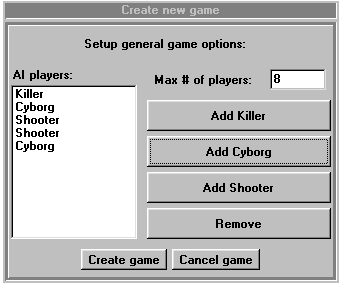
Specify the maximum number of players allowed in the game including yourself in the Max # of players box. Valid values are from 1-8.
You can add AI players with the following buttons:
Add Killer : Killers are the Deadliest AI bots. Add these only if you are very confident of your skill.
Add Cyborg: Cyborgs are very nasty bots that do not miss often. They are recommended for intermediate skill levels.
Add Shooter: Shooters are good bots for beginners to start out with. They tend to make mistakes and sometimes even blow themselves up.
Multiple AI players using any combination can be selected.
All selected AI players are displayed under the AI players box. Clicking
on an AI player from the AI players box and clicking Remove will remove
the player from the list.
To start your own game at this point, click on Create Game. Once you have clicked on this button, all subsequent players(upto the maximum players limit) that login will be taken directly to your game as Joining Clients. Once the maximum players limit s et by you has been reached, the next player to login will become the MC of a separate independent game.
To cancel click Cancel Game
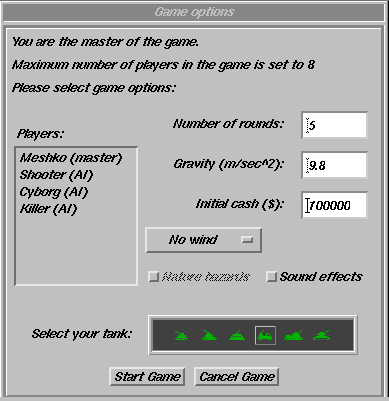
Game Options
This dialog allows you to set up the remaining game options:
All Players logged into the game are listed in the Players box. The master client has (master) printed in front of his name. AI players have (AI) printed in front of them. All joining clients are printed without any suffix.
Number of rounds: Use this box to specify the number of rounds to be played before the game ends.
Gravity (m/sec^2): Select the acceleration due to gravity or g here. The default value is 9.8 m/s2 to simulate earth like conditions. Feel free to use values for any planet, moon, asteroid etc. you want to be on!
Initial Cash: Specify how much money each player will start out with to spend in the shop after each round.
Wind: Use the pull down menu to select between the following 3 wind conditions:
Nature Hazards : Check this box to activate special in-game conditions such as meteors and lightening.
Select your tank: There are a variety of tanks for you to choose from. While the difference between the tanks is cosmetic, we suggest you choose the tank which best defines you as a warrior!
Use the Start Game button when you are satisfied with the number of users that have entered the game and the game options.
Note:- After this point no new users can join until the end of the game in progress.
To cancel the game and go back to the main menu, use the Cancel Game
button.
Joining Clients
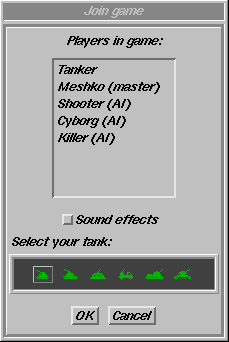
All clients joining the game server after the MC are called joining clients, referred to hereon as "JCs". After logging in, JCs will be presented with the dialog box pictured to the right.
All players that are already in the game are listed under the Players in game box. JCs are given the following options after logging in:
Use the Select you Tank option to select the desired tank type.
Click the OK button to indicate that you are ready to join the game.
Click the Cancel button to go back to the previous game.
table of contents
GUI AND KEYBOARD COMMANDS
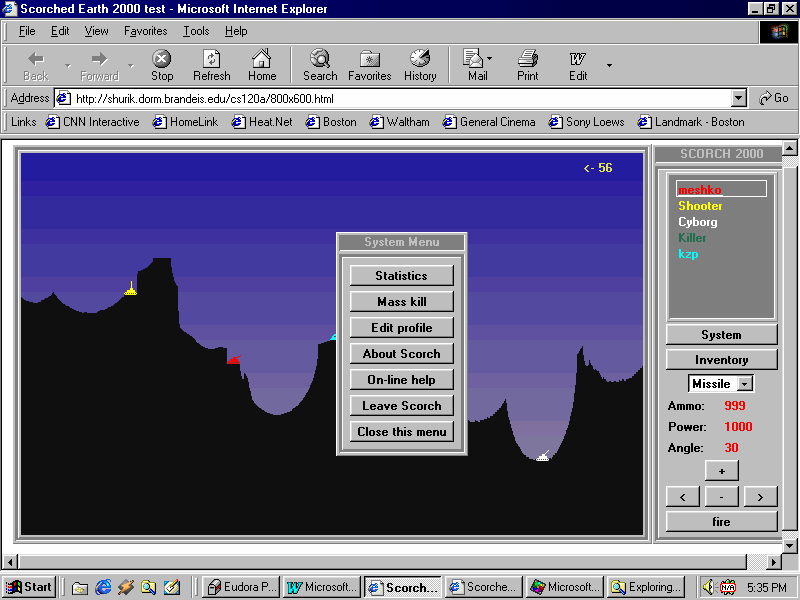
The above screen is a typical example of a game of Scorched Earth 2000. This section will familiarize you with the in-game GUI and keyboard commands.
The upper right box lists all the players in the current game. The color
of the text corresponds to the color of the players tank(for example the
cyborg has a white tank). When a players tank is destroyed, it disappears
from the screen and his/her na me appears in black letters.
The current wind condition is printed on the top left corner of the screen. In the game pictured above, there is a wind of power 56, headed towards the left direction.
Clicking on the System button will bring up the system menu(as pictured above). Note that clicking here does not pause the game. The game will keep running in the background.
Statistics : Clicking this button will display your player statistics. Statistics information is stored in the user profile so records from previous battles will be reflected.
Mass Kill : This option is only available to the MC. Clicking this button will lead to all the tanks self-destructing and the commencement of the next round.
Edit Profile : Use this button to change the information you entered in your user profile.
About Scorch : Clicking here will display a list of credits and version information for Scorched Earth 2000.
Online Help : Clicking here will open a new browser window pointing to the online user manual.
Close this Menu : Clicking here closes the System Menu.
Leave Scorch : Clicking here will take you back to the main menu.
Clicking on the Inventory button displays a list of the various weapons and items you possess as well as their respective quantities. The Inventory can only be accessed if it is your turn to shoot. If you have a shield you can use it by clicking on the activate button. This will cause a circle to appear around your tank, indicating that the shield is active. Once the shield is destroyed, the circle will disappear. Use the select button if you want to select the weapon corresponding to it. Click ok to return to the game.
The active weapon is printed below the Inventory button. To change the current weapon click on the arrow button next to the weapon and choose from the pull-down menu that appears. Look at the Weapons section of the manual for a description of the diffe rences between the available weapons.
The current Power and Angle are printed in red under the active weapon section.
To specify an angle to launch your weapon with, use the < and > buttons on the GUI. These buttons change the angle by 3 degrees. You can also use the left and right arrow keys on your keyboard to change the current angle. This approach changes th e angle by 1 degree. Using the arrow keys while keeping the control key pressed changes the angle 5 degrees at a time. The Home and End keys change the current angle by 10 degrees respectively.
Changing the Power is very similar to changing the angle. Use the + and buttons to change the power from the GUI. These buttons change the power by 3 units. You can also use the up and down arrow keys on your keyboard to change the current power. Thi s approach changes the power by 1 unit. Using the arrow keys while keeping the control key pressed changes the power 5 units at a time. The Page Up and Page Down keys change the current power by 10 units respectively.
When it is your turn the Fire button will pop up. Click it to launch
your weapon once you are satisfied with your selected weapon, angle and
power. Note that shots fired out of the GUI (because of high power values)
will drop back if they are still in range of the map.
table of contents
GAME RULES (How to Play)
The following are the basic rules of the game:
The objective of the game is to destroy all enemy tanks. The initial tank positions within the battlefield are randomly decided but no two tanks are placed closer than a set minimum distance from each other.
Scorched Earth 2000 is a turn based game. The game server randomly determines the initial order of turns. You can see whose turn it is by checking which player has a box around his name(In the figure on page 11, it is Xixis turn to launch). Upon launc hing a weapon the next player in line has his/her turn. Turns move in a cyclical order.
When it is your turn, the Fire button pops will pop up in your GUI. On your turn, choose a weapon and specify an angle and power (velocity) for it to be fired with. Refer to the previous section for instructions on using the GUI and keyboard commands.
If you launch a direct hit on the enemy, the enemy tank will be immediately destroyed. On the other hand, a partial hit will cause the enemy tank to get damaged. A damaged tank loses some of its power when firing weapons(the maximum power it can launch with decreases). The more damage a tank incurs, the lower its maximum power for launching weapons. If a tank is severly damaged, even a partial hit will destroy it.
Shields are useful as they absorb all damage from enemy fire up till the point that they are destroyed. A shield can take about as much damage as a tank, so in effect they double your life capacity. Look in the GUI section for instructions on how to activate a shield.
You will receive money for damage done to enemy tanks. Destroying an enemy tank gives you large bonus. You will be penalized for hurting and killing yourself, so be careful with the weapons of mass destruction.
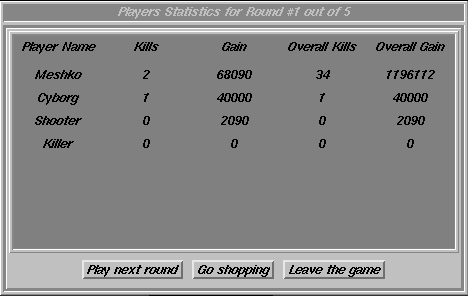
Round End
The round finishes when there are less than 2 surviving tanks left. When the round ends, the End of Round dialog box comes up, displaying user statistics up to the point of the game.
Click Play next round if you do not wish to go to the shop and are ready to play the next round. Once all players indicate they are ready to play the next round will commence.
Click Go shopping if you want to go to the shop to purchase additional weapons and accessories.
Click Leave the game if you wish to stop playing.
The Game finishes at the end of the number of rounds specified by the
MC. The player who makes the most kills wins.
Shop
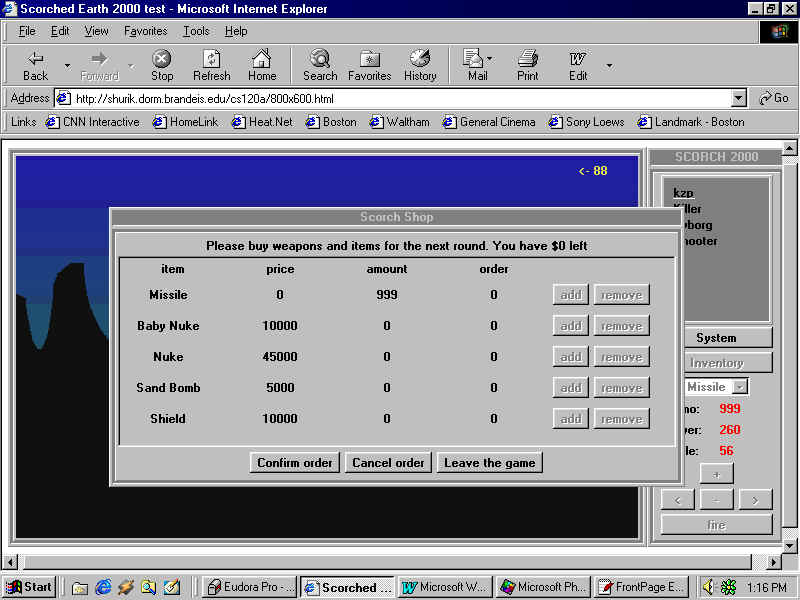
At the end of each round, players have the option to go shopping for additional weapons. The amount of money you have to spend will be displayed on top of the screen.
To make a purchase, simply click on the add button next to the weapon you wish to buy.
If you change your mind about a weapon you can use the Remove button corresponding to that particular weapon to remove it from your inventory and get a refund.
When you are satisfied with your purchases, click on Start the Next Round Button.
If you wish to stop playing click on the Leave the Game button.
table of contents
CHAT
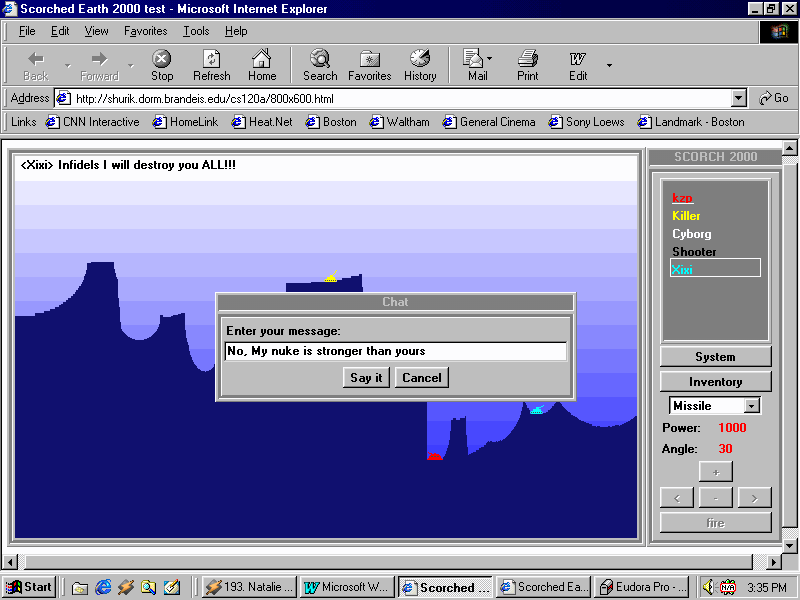
It is possible to send broadcast chat messages at any point once the
game has begun. To send a chat message, simply start typing your message
out on the keyboard. A chat box like the one above will automatically pop
up. To send your message click Say i t. If you decide not to send the message,
click Cancel. All users will see broadcast messages on the top-left corner
of the screen.
table of contents
WEAPONS
Missile : This is your standard-issue default weapon. Every tank
comes with an unlimited number of missiles. The tradeoff is that missiles
have the smallest radius of destruction.
Baby Nuke : This weapon is good value for money. It provides
a much larger radius of destruction than standard missiles. This weapon
is useful when you are uncertain about the accuracy of your shot on the
enemy. Even a somewhat inaccurate launch should be able to take out any
nearby enemies.
Nuke : This is the big daddy of all the weapons in your arsenal.
Nukes are expensive so use them wisely and sparingly. The nuke is best
used when you want to take out two enemies with one shot.
Sand Bomb : This is more of a strategic weapon. It covers the
area it lands on with a layer of sand. It is useful for burying enemies.
Once buried an enemy tank will probably blow up when it fires from under
the sand.
Baby Roller : This weapon is similar to the Roller, except it
costs less and does less damage.
Roller : This is weapon is useful when your opponent is
on a smooth slope. As soon as it hits a mountain, it will start rolling
downhill until it hits either an enemy, or an upward slope. At that point,
it will detonate.
Heavy Roller : This is a more expensive, but more damaging, version
of the Roller.
Baby Digger : This weapon is similar to the Digger, except it
costs less and is less effective.
Digger : This item is very useful when you've been hit by a sand
bomb. When it detonates, it will literally eat away at the dirt around
it.
Heavy Digger : This is a more expensive, but more effective,
version of the Digger.
Funky Bomb : This is one of the most dangerous bombs of all.
When it detonates, it first throws out several random explosions around
the screen. Although most will explode near the target, there is the risk
that the funky bomb can kill the person who is shooting. After all of this,
there will be one more explosion, about the size of a baby nuke, at the
original detonation point.
Funky Nuke : This is very similar to a Funky Bomb, but instead of a Baby Nuke exploding at the end, a Regular Nuke will explode. It also costs more.
Napalm : Napalm is a unique type of weapon. When it hits a mountain
or player, it releases a flood of Liquid Fire that will flow downhill until
it hits an upward slope, at which point it will form a pool, possibly drowning
an enemy.
Hot Napalm : This is a more expensive, and more damaging, version
of Napalm.
MIRV : This is one of the most powerful weapons. When fired,
it starts out looking like a normal missile. However, at about the time
that the missile reaches the top of the arc, it releases several sub-munitions.
These will rain down upon the target with amazing results. Each sub-munition
will explode with about half the force of a baby nuke.
Death Head : This is probably THE strongest weapon. It works
very similar to the MIRV, except that each sub-munition will explode with
the force of a whole Baby Nuke.
Shield : This is probably one of the most important items in
the game. When activated, it will absorb a large portion of any damage
dealt to the user. Every time it absorbs some damage, it's strength is
reduced. When a shield's strength goes below 0, it is destroyed. Unless
a new shield is activated, the user will be very vulnerable to attack.
Medium Shield : This is a more expensive version of the Shield.
It will take a larger amount of damage before it is destroyed.
Heavy Shield : This is the most expensive version of the shield.
It can absorb the most damage before it is destroyed.
Parachute : This is basically a gigantic parachute for
your tank. If the ground below your tank is destroyed, you would usually
take damage from the fall to earth. With the parachute activated, however,
your tank will fall gently to the ground without much more then a scratch.
Battery : When your tank is damaged, you can use batteries to
restore it's strength. Although each battery adds 10% (100 power) back
to your tank, your strength can never be higher than 100% (1000 max power).
The batteries do not affect shield strength.
Tracer : This item adds smoke trace to your shots. It is very useful
when for aiming. The trajectory of each shot fired with tracer will stay on the
screen for some time after the shot is made.
Auto Defense : This item allows you to activate your items before the round starts. You can turn on the shield, parachutes and any other items you have before anyone even has a chance of shooting at you.
table of contents
STRATEGIES AND TIPS
This user manual has been written and designed by
Kapil Mehra (updated on 11/9/2000 by Philip Bisnow and Mikhail Kruk)
Valuable contributions and suggestions were made by the
following people in the preparation of this document:
Hei C. Ng
Alex Rasin
Nathan Roslavaker
John Langton
Ramya Ramesh